Cube robot papercraft
Build a 40 mm robot from one sheet of cardstock. Its face, side dials and back vents all fit on a single cube net.
- Difficulty
- Easy
- Cardstock
- 160–200 gsm
- Finished size
- 40 mm cube
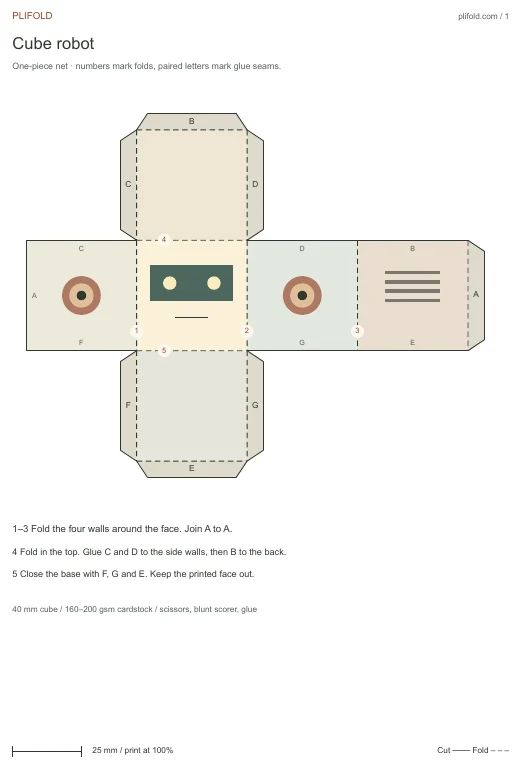
Cube robot papercraft template materials and scoring
- One sheet of cardstock, scissors, ruler, a blunt scoring tool and paper glue.
Step by step
- Print and check the scale. Choose your paper size and print at 100%. The scale bar must measure 25 mm, and a face should measure 40 mm on each side.
- Score before cutting. With the sheet flat, run the blunt tool along all dashed lines, including the tab bases. Cut the solid outer contour in one piece. Leave every lettered tab attached.
- Wrap the four walls. Bend folds 1, 2 and 3 away from the printed face. Test-fit the strip around a square, then glue tab A inside the edge marked A. The eyes face out.
- Close the top and base. Fold the lid at 4. Slip tabs C and D inside the side walls and B inside the back. Once set, fold at 5 and close F, G and E the same way. All seven letter pairs should meet inside the cube.
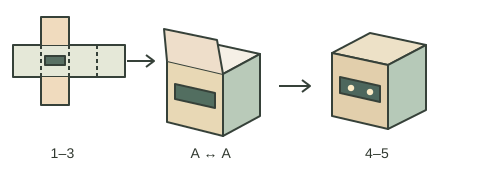
Planning a 40 mm cube robot
This net suits a first build with tabs. All six faces stay attached, so there is a single piece to keep track of after cutting. Allow 25–40 minutes of hands-on work as a planning estimate and leave extra time for the glue to set. If you are making it with a child, share the work at the scoring stage. One person can hold the ruler while the other draws a blunt tip along the line.
Choose A4 for a 210 × 297 mm sheet or US Letter for an 8½ × 11 inch sheet. Select actual size in the print dialog. Measure one square in both directions before cutting. A 40 mm width with a different height means the print has been stretched. The eyes belong on the front wall and the dials on the sides. Make any changes to their colours while the page lies flat.
Finding the back seam before adding glue
Stand the four connected walls on a level surface and turn them until the two eyes face you. The strip should form four right angles with the back edge marked A sitting just behind the last wall. Look through the open top. If that opening resembles a diamond, hold opposite corners gently until the base takes a square shape. A scrap square cut to 40 mm makes a quick gauge that you can lift out again.
Keep the lid and floor open while the first joint sets. A small scrap of card fits inside the tube and gives you something to press against without denting the face. Apply a thin film of glue to the tab. If glue squeezes out along the printed edge, lift it away with a clean offcut while it is still wet. Glue that has started to dry can pull colour off the surface.
Closing the lid and checking the feet
Dry-fit the top before closing the base. The free lid edge should meet the back wall and both side edges should land level with the dials. If the lid dips into the body, check that its side tabs fold inside and that the four walls still make a square. Press the last flap from the outside against a flat surface so the robot can stand without rocking.
To use the figure as a place marker, write a name on the back panel before closing the bottom. For a shelf display, group several robots by drawing a different expression on each loose net. The assembly drawing shows the wall seam and lid order. An independent learner build with real paper is still pending.
See a glue tab fitted inside a paper model (Desert Botanical Garden)