Quilling flower pattern for beginners
Roll six matching teardrops around a tight paper centre. The printable sheet gives you the petal positions, two coil gauges and cut lines for both colours on one sheet.
- Flower height
- 44 mm on the layout
- Paper width
- 3 mm throughout
- Pieces
- 6 petals and 1 centre

Paper quilling materials and strip lengths
- Six strips of coloured paper, each 150 × 3 mm, for the petals. Begin with ordinary 80–100 gsm paper that takes a curve easily.
- The sheet includes four 130 × 3 mm strips for the centre. Colour these before cutting or use one as a guide on contrasting paper.
- A slotted quilling tool or a smooth cocktail stick, tweezers, paper glue, a ruler, clear release film and a card for mounting.
Step by step
- Print and measure. Choose your paper size and print at 100%. Measure the short bar at the bottom. Both end ticks should be 25 mm apart. Cut the six long petal strips and four shorter centre strips. Keep the flower layout and both gauges in one piece. Slip the sheet beneath clear release film before bringing glue to the layout.
- Roll six loose coils. Catch just the first few millimetres of a petal strip in the tool. Turn slowly, guiding the sides between finger and thumb to keep the edges level. Slide the roll off the tool and let it relax to the 15 mm circle. Touch glue to the very end and hold it against the next turn. Repeat with the five other strips.
- Pinch the teardrop shapes. Place a loose coil flat on the table. Nudge the inner turns toward one side with the tool tip. Pinch the opposite side between finger and thumb. Compare the pinched coil with the single petal guide. The point and the rounded end span about 18 mm. Make the other five match the first.
- Wind the centre and mount. Wind one short centre strip tightly. Overlap the next length by 2 mm and keep winding until the coil fits the 8 mm gauge. Trim and seal it. Set the centre on the flower drawing and bring each petal point up to its edge. Join each contact with a small dot of glue. Once the joins have set, lift the flower from the film and glue the undersides to a card.
Three quilling shapes to check on the template
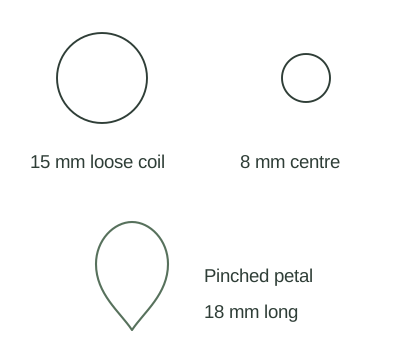
The tight coil makes the round centre. Keep it on the tool while comparing its diameter with the small circle. Paper thickness and the size of the tool affect how much length it uses. If the four lengths run short with thin paper, cut another 3 mm strip from the margin. Unwind any excess before trimming. For joined strips, a tiny overlap keeps the seam from making a bump on the finished rim.
The loose coil starts out round. Its outer turn should sit inside the larger circle while the inner turns can move a little. Once pinched, it becomes the third shape, a teardrop. Place a second petal over the printed outline before making the whole set. A thin point reaches the centre easily. A broad, crushed point takes up the space needed by its neighbours.
Arrange the petals in opposite pairs
Set the top and bottom petals in place first. Look straight down to see whether their tips line up through the centre coil. Set down the other two opposite pairs in the same way. Use the printed outlines to leave visible gaps between the rounded ends. A petal that sits high on one side may have a strip edge sticking out underneath. Press the loose piece gently against the tabletop to level that edge before you glue it.
Use the flower on a journal card
A 64 mm wide borrowing card leaves room on both sides of this flower. Mark its position lightly, pick up the flower with tweezers and touch glue to the lower edges with an offcut. Press the centre down first, then each rounded petal. A raised flower works on a mounted card or journal cover. To carry a decorated card in a pocket, keep the coils clear of the opening and check that the pocket has enough room for the shape.
The layout and gauges are drawn to scale. A learner build with these strip lengths is pending.