Printable cube net with glue tabs
Print a blank 40 mm cube on A4 or US Letter. Cut one piece, fold six equal squares and match seven lettered tabs. The outside stays blank for drawing.
Download A4 cube net Download US Letter cube net
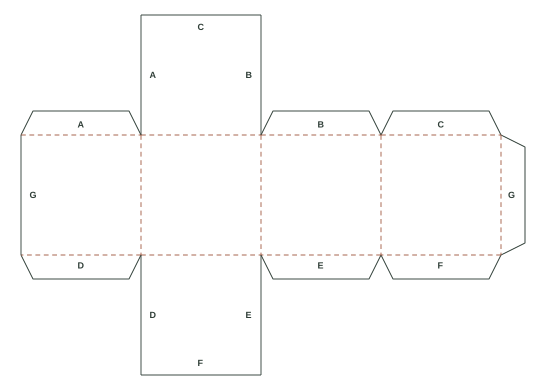
How to make the paper cube
Use a ruler, scissors, a blunt scoring tool, paper glue and a sheet of light card. Select actual size in the print dialog. Measure the 25 mm bar before you cut. Each square should measure 40 mm (about 1.57 inches) on every side.
- Cut and score the net. Lightly score each dashed line against the ruler. Cut the solid outline, keeping all seven sloping tabs attached. Decorate the unprinted side now if you want colour on the outside.
- Join the four walls. Fold the walls up around the printed side. Tuck tab G behind the opposite edge marked G and glue. Look through the tube from one end. The opening should be square before the glue sets.
- Close the bottom. Fold D, E and F inwards. Put a little glue on the outward-facing side of each tab. Lower the bottom square onto the tabs and press through the open top.
- Close the top. Test-fit the last square over A, B and C, then glue the tabs. Hold the lid by its edges so the middle stays flat. If one corner lifts, check for a tab caught on the outside.
Use the blank faces
Draw six story prompts before folding, or mark opposite faces with matching colours. The caps sit opposite one another. In the wall strip, the first square lands opposite the third, and the second lands opposite the fourth. For a decorated variation, print the cube robot. For an open container with a removable lid, fold an origami box with a lid.